

This is the front cover of a small Memory Book I've been working on this week. I took some pictures along the way showing how I made the outside.

This is the blank chipboard album I started with.
 The first thing I did was to cover both the front and then the back with purple distress crackle paint from Ranger. This is really fun stuff. I love that the brush is attached to the cap of the bottle so you never have to worry about where to place it or have to clean it!
It took about an hour to an hour and a half to dry and to really start to see the crackling effect.
 When it was dry I swiped my Staz-On Opaque ink across the surfaces I had applied the paint to on both the top and bottom of my album.
 I next used a darker shade of purple to ink up the edges of the chipboard and lightly applied a little across the top of the cover.
 My first stamp was this stamp from Paperbag Studios. I stamped it with brown Staz-On. Because of the crackle paint it didn't come out very dark, but I liked the muted effect.
 I then stamped this harlequin design from Paperbag Studios with orange Staz-on. I was not really happy with how that looked, seemed a bit too bright. So I stamped over it with Staz-on opaque white. I liked that look much better.
 My third stamp was this border stamp from Paperbag Studios which I stamped along the edge of my album giving it a faux bound look.
 I missed a few pictures at this point but basically I stamped the bleeding heart flower stamp (Studio G) up at the top with the orange Staz-On.
I added my Memories (Studio G) across the center of the cover with black Staz-On.
I then stamped the Postmark stamp (Paperbag Studios) twice near the bottom again using black Staz-On.
I also took my brown Copic marker and colored in her dress a bit.

The final step was adding this metal and leather tag (just a scrap I had lying around). I also added a metal heart on my tag.
And that was it!
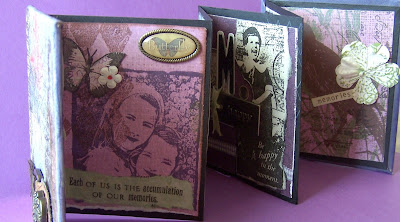
Here's a little peek into the inside.
1 comment:
A lovely little book. Thanks for the Tutorial....Mgt.
Post a Comment